Friday, October 25, 2019

Butterfly Symmetry Art

Hello artistic spirits!

Today's project is butterfly Symmetry art; this is a project I did with my toddler class (ages 1-2) but is a perfect simple project to do with any young kids, toddler-preschool age. This project is a great opportunity to begin exploring the concept of symmetry for younger ages.


Supplies:
  • Washable Tempera Paint 
  • Butterfly cutouts (on white paper)
  • paintbrushes (you can also use cue tips)


Step 1: Fold the butterfly cut-out in half.

Step 2: Cover the (face-up) side of the butterfly with thick dots of paint in any pattern with any colors you'd like.

Step 3: Once you're satisfied with your paint, open the butterfly up.


Step 4: Refold the butterfly so the un-painted side covers the painted side; then squish the paint together between the paper with your hand.

Step 5: Carefully open the butterfly up, and you'll have a beautiful, colorful, and symmetrical butterfly creation!


Hope you have so much fun with this project! 


Saturday, October 19, 2019

Salt Dough Mosaics

Hello artistic souls! Time for another fun project. Today we have a mosaic project fun for all ages! I did this project with my first grade class; but it would also be a great project for preschool as well as older elementary classes.


Supplies needed:
  • Salt
  • Flour
  • Water
  • Mosaic pieces (this can be anything you have on hand: for this example I used Glass drops, various kinds of beans, and small rocks)

Step 1: Create the salt dough base by mixing 2 parts flour, 1 part salt, and 1 part water until you get the consistency of dough. (I find that sometimes a little more water is needed). You can begin with a mixing tool, but eventually will have to get your hands dirty and kneed it until you have the desired consistency.


Step 2: Take a small ball of the salt dough and flatten it on a working surface, this will be the base to stick your mosaic pieces in. (It will eventually harden without baking after 2-3 days depending on how flat it is)

Step 3: Design your mosaic! This can be a picture, or just simply a pattern. Be sure to press the pieces deep into the dough base, so that they don'f fall off the surface in the drying process.


 Step 4: Leave your mosaic as is, after 2-3 days it will harden completely without the need to bake the salt dough.


Have fun!

Friday, October 18, 2019

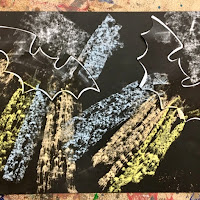
Halloween Bat Silhouettes

This Halloween, get in the spirit with a fun creative craft; Halloween bat silhouettes!

This fun and not-so-spooky craft is simple, and great for all elementary ages! Its a great project to hang up around the holiday for extra ambiance, and is a perfect opportunity to start talking about the concept of silhouettes in art if you're teaching in a classroom setting.


Supplies needed:
  • Black construction paper
  • Bat cut-outs (you can always have the kids draw and cut out their own!)
  • Tape
  • chalk and/or oil pastels
Once you have all your supplies, its time to get started!

Step 1: Have the kids roll up tape pieces and stick them to the back of the bat cut-outs, so that they can place the bats wherever they'd like on the background.

Step 2: The kids will chose which color chalk and/or oil pastels they want to frame the background of their silhouettes. The trick here, is to have them start coloring from the bat, outwards. That way no color will get under the cut-out accidentally


Step 3: Once the coloring is finished, gently peel off the bat cut-outs and Ta-Da! You have your finished piece!

                                                         
Hope you have fun getting artistic and creative with this project! And Happy Halloween!


Spooky Halloween Trees

Hello and welcome back! Today I'm sharing another fun Halloween project. These spooky Halloween Tree paintings are a perfect projec...